IMAP access to an Office 365 (Exchange Online) mailbox
This tutorial explains steps necessary to connect to an Office 365 mailbox by IMAP protocol.
Microsoft has deprecated basic authentication access to Exchange Online. Consequently, OAuth2 authentication is now required. This scenario pertains to background applications (or daemons) that do not require user consent to access the mailbox and do not have a web interface. These applications are referred to as service principals. We employ the Client Credentials Grant Flow in OAuth2, facilitated by the Microsoft.Identity.Client library available through NuGet.
Microsoft Entra portal setup
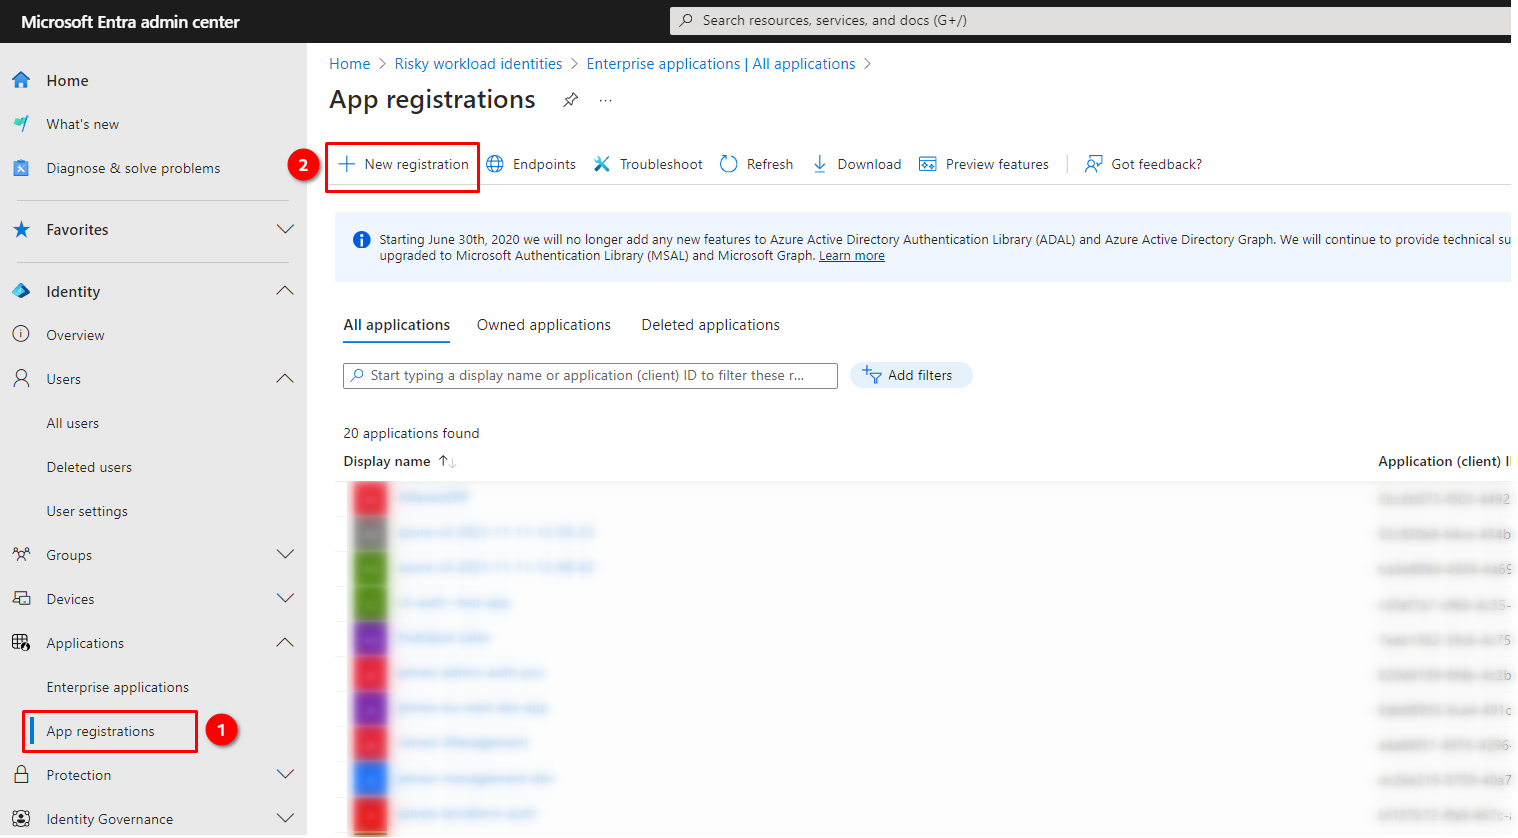
Go to Microsoft Entra portal, to the section Applications > App registrations.
Click "New registration".

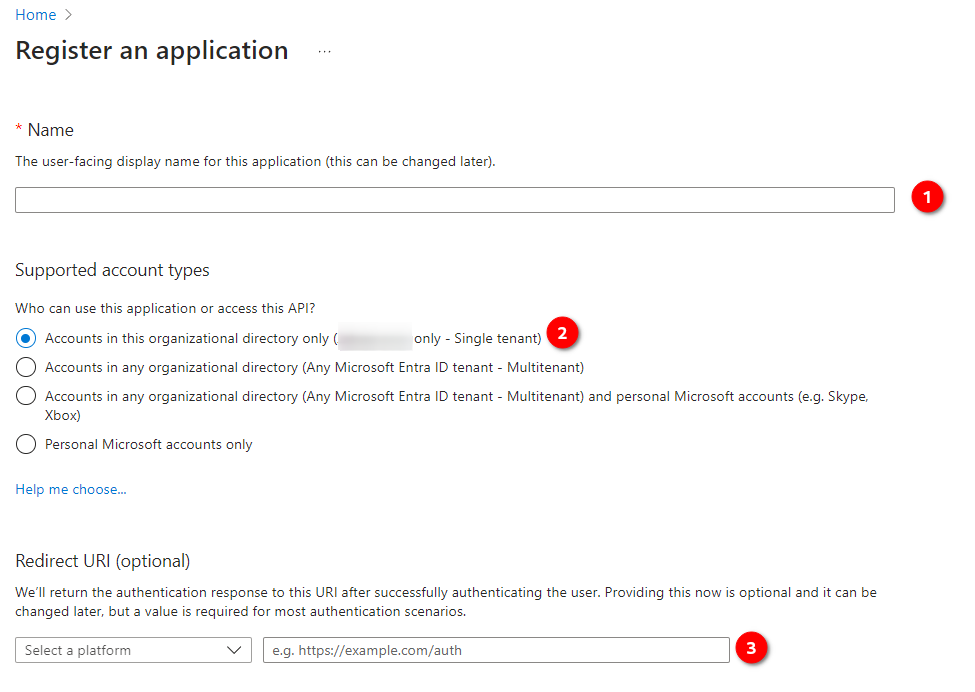
In the dialog, you can choose whatever name for your application (1).
If you need to connect to a mailbox inside your company, you select "single tenant" in (2). Since we are dealing with a background application, there are no redirect URIs (3), and thus, this field will remain empty.

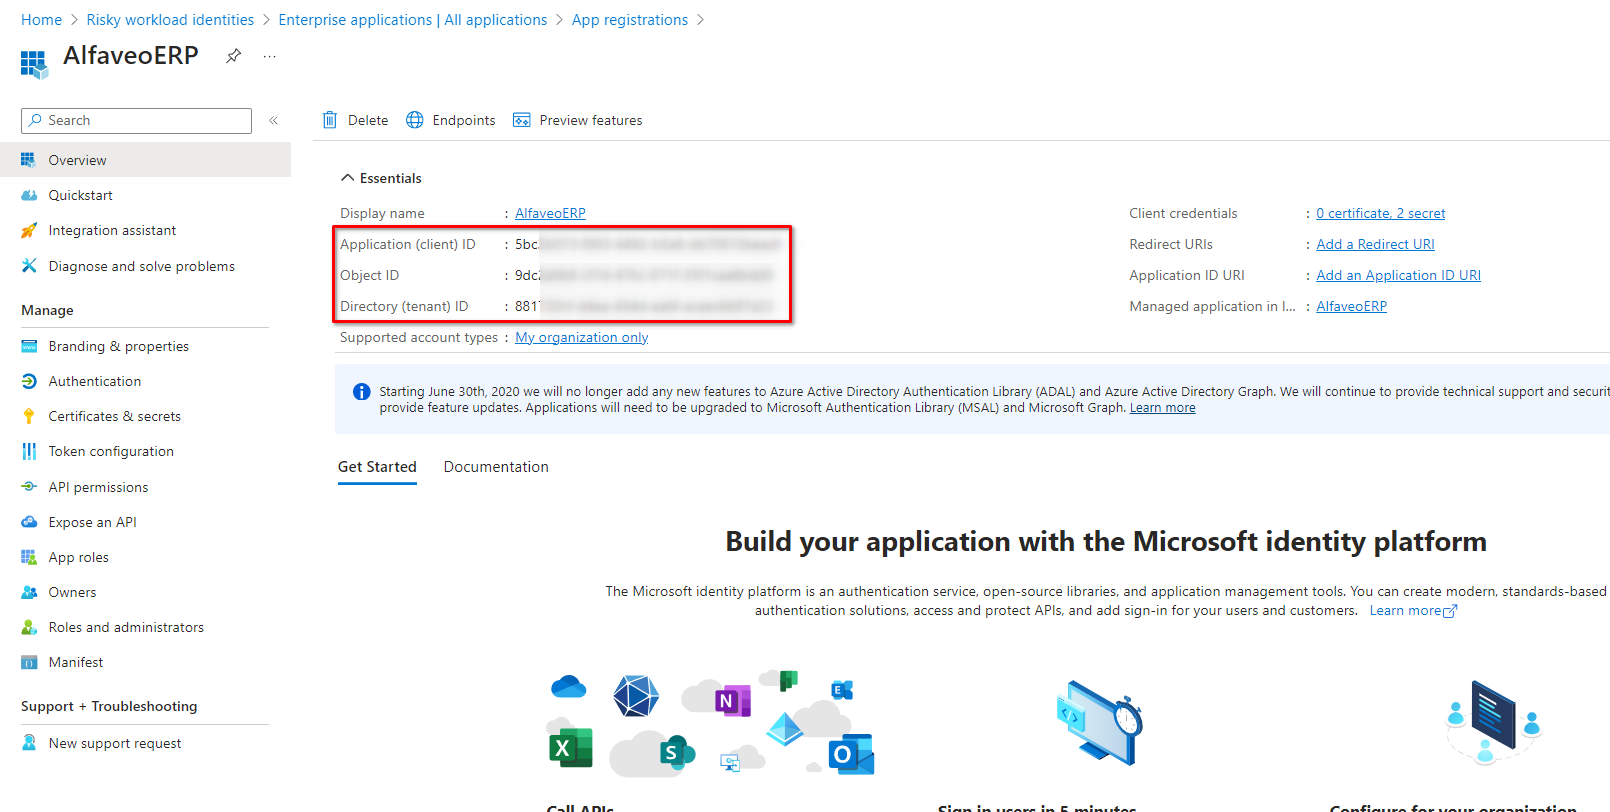
Navigate to the new application details page and take note of the Application (Client) ID, Object ID, and Directory (Tenant) ID. These details will be required in the code later.

Go to API permissions section of your app. Add a permission IMAP.AccessAsApp (1) and then grant admin access (2).

Powershell setup
To grant access to the desired mailbox for our service account, you need the assistance of an Office 365 administrator, who should perform this action from a Windows computer. We use the "old" Windows PowerShell (x64), as attempts with the x86 version of Windows PowerShell, PowerShell 7, or other operating systems were unsuccessful.
You need to start Powershell as administrator.
First, install the required modules by responding 'Y' (Yes) to prompts regarding the installation of the NuGet provider and trusting the repository, as it is an official Microsoft repository:
PS> Install-Module AzureAD
PS> Install-Module ExchangeOnlineManagement
Next, we log in to Azure. This action opens a webpage requesting consent. You will need to make note of the TenantId from the output for later use.
PS> Import-Module AzureAD
PS> Connect-AzureAD

Account           Environment TenantId     TenantDomain   AccountType
-------           ----------- --------     -------------  -----------
admin@example.com  AzureCloud  665ds....    example.com    User
Next, we connect to Exchange Online.
# we need to temporarily allow execution policy of Powershell scripts, you can disable it after connecting to Exchange online
PS> Set-ExecutionPolicy -ExecutionPolicy RemoteSigned
Execution Policy Change
The execution policy helps protect you from scripts that you do not trust. Changing the execution policy might expose
you to the security risks described in the about_Execution_Policies help topic at
https:/go.microsoft.com/fwlink/?LinkID=135170. Do you want to change the execution policy?
[Y] Yes  [A] Yes to All  [N] No  [L] No to All  [S] Suspend  [?] Help (default is "N"): Y

PS> Import-Module ExchangeOnlineManagement

# this will again display a webpage with consent
PS> Connect-ExchangeOnline

# set the execution policy back
PS> Set-ExecutionPolicy -ExecutionPolicy Restricted
Now we grant access to a desired mailbox.
# DisplayName can be whatever
PS> New-ServicePrincipal -AppId <our app id> -ServiceId <our object id> -DisplayName "<Your Application Service principal>"

PS> Add-MailboxPermission -Identity "<mailbox>" -User <our object id> -AccessRights FullAccess

PS> $startDate = Get-Date
PS> $endDate = $startDate.AddMonths(12)
PS> New-AzureADApplicationPasswordCredential -ObjectId <our object id> -CustomKeyIdentifier "IMAP Secret" -StartDate $startDate -EndDate $endDate

CustomKeyIdentifier : {12, ...}
EndDate             : 07.10.2025 14:33:27
KeyId               :
StartDate           : 07.10.2024 14:33:27
Value               : 2TV5UG...
Here, the Value is what we need to use in the code as client secret.
C# Code
We need to add the NuGet packages MailKit and Microsoft.Identity.Client to the project.
using MailKit;
using MailKit.Net.Imap;
using MailKit.Search;
using MailKit.Security;
using Microsoft.Identity.Client;

const string tenantId = "881...";
const string clientId = "5bc....";
const string clientSecret = "2TV5UG...";

using (var client = new ImapClient()) {
    client.Connect ("outlook.office365.com", 993, SecureSocketOptions.SslOnConnect);

    IConfidentialClientApplication confidentialClientApplication = ConfidentialClientApplicationBuilder
        .Create(clientId)
        .WithClientSecret(clientSecret)
        .WithAuthority(new Uri("https://login.microsoftonline.com/" + tenantId + "/v2.0"))
        .Build();

    AuthenticationResult authToken = await confidentialClientApplication
        .AcquireTokenForClient(["https://outlook.office365.com/.default"])
        .ExecuteAsync();

    SaslMechanismOAuth2 oauth = new SaslMechanismOAuth2("your_mailbox@your_company.com", authToken.AccessToken);
    client.Authenticate(oauth);

    // example how to read 10 messages from Inbox folder

    client.Inbox.Open(FolderAccess.ReadWrite);  // or FolderAccess.ReadOnly
    var uids = client.Inbox.Search(SearchQuery.All);

    foreach (var uid in uids.Take(10)) {
        var message = client.Inbox.GetMessage(uid);

        Console.WriteLine(message.Subject);
    }

    client.Disconnect (true);
}
Resources
- Good walkthrough video Office 365 IMAP OAuth With C#
- Application and service principal objects in Microsoft Entra ID
- Microsoft identity platform and the OAuth 2.0 client credentials flow
- MS Office 365 Exchange OAuth2 IMAP Authentication with Flowable - Part 1 Azure Setup
- Powershell script for testing getting of authentication token Get-IMAPAccessToken.ps1
- Video using different approach requiring user consent (Code flow) How to connect to office 365 with IMAP protocol on behalf of a user
- POP, IMAP, and SMTP settings for Outlook.com
- MailKit library IMAP examples
- Another walkthrough guide