App Builder
The Jetveo App Builder is where the source code for apps is written, edited, and maintained.
To create a new app, on the Jetveo Workspace, click (+) Create App. Or, locate an existing app and click the name; on the App Overview, in the leftmost box, click Edit Application.
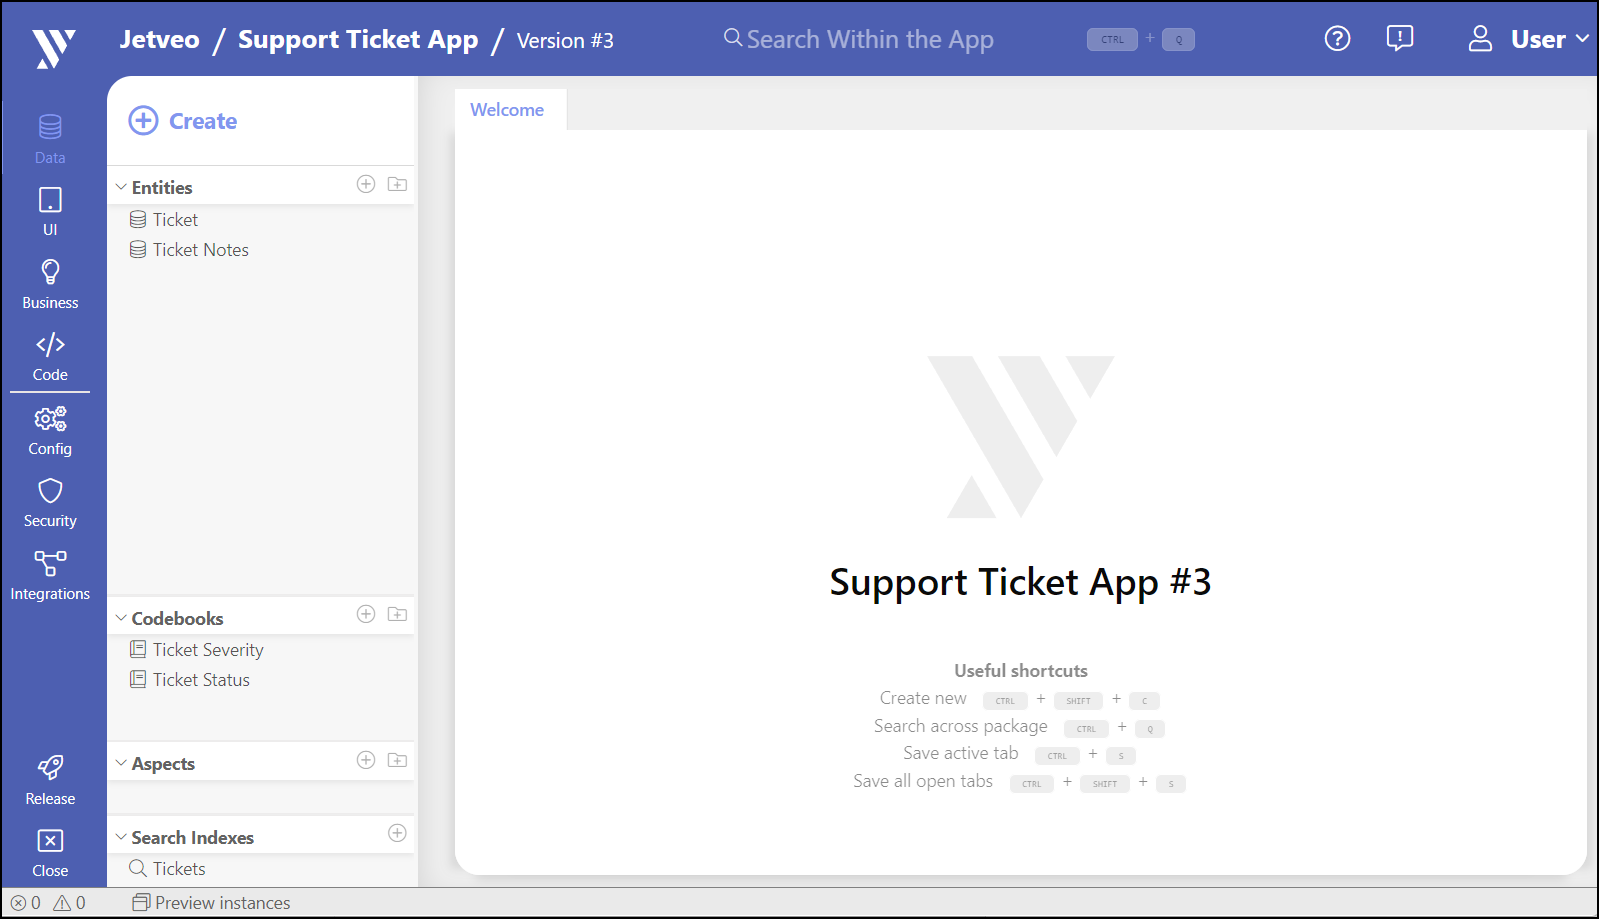
The Jetveo Apps Builder has a top bar menu, a sidebar menu, a side panel, the editor section, and (if necessary) the Help Panel can be opened on the right. The Status Bar is across the bottom; it includes notes for errors and warnings, and a link to Preview Instances.
Navigation

Top bar
The top bar of the App Builder is similar to the top bar on the Workspace; however, the page title is expanded with links to the Workspace and the App Overview. The features are (from left to right):
- the Jetveo logo;
- the name of the Workspace (which links to the Workspace) / the name of the application (which links to its App Overview) / the version of the application;
- the Search feature, which searches for elements within the app if it is established in the source code;
- a link to open the Support Panel and access the Support Portal; and
- access to user information, with a drop-down menu to switch to other Workspaces (and create a new Workspace to help organize projects and access), a link to My Profile and a link to Log Out.
Return to the Workspace in two different ways: click the Workspace name or, in the user account section, click My Workspaces and select the appropriate destination. Click (+) Create New to establish a new Workspace.
Return to the App Overview in two different ways: click the app name or, in the side bar, click [×] Close (see below).
Sidebar Menu
The side bar has icons that link to different sections of the App Builder, which have subsections for building and editing the app. The main sections are:
- Data
- UI
- Business
- Code
— - Config
- Security
- Integrations
— - Release
- Close
The top sections (i.e., Data, UI, Business, Code) are directly related to the building and editing of the app.
The middle sections (i.e., Config, Security, Integrations) establish settings for the usage of the app.
The bottom has two operations:
- Release will release the source code and allow for the creation of live instances for the app, or update existing instances;
- and Close will take the user to the App Overview.
Side-panel Menus
Click on any section to show its subsections in the side panel. The default presentation shows the Data subsections.
Subsection headers include the name (i.e., Entities), a Create button (i.e., (+)), a Create folder button (i.e., Folder +) and a Collapse all folders button (i.e., [–]). When new pages are created, they are listed in the space below, where they can be organized in folders. Each section can be expanded or minimized (i.e., the caret symbol to the left of the name).
Double-click pages to open them into the Editor.
The subsections can be reduced/expanded vertically by placing the cursor over the top line and dragging it to the desired height.
Everything above is the same for subsections of all sections.
The side panel can be reduced/expanded horizontally by placing the cursor over the rightmost line and dragging it to the desired width. You can also hide it by clicking CTRL + B.
Editor
The work of the App Builder is done in the Editor, the central space of the page layout.
The initial display will show the name of the app, the version, and useful shortcuts.
Pages that are created and settings dialogues will appear here. Most have additional pages that will open into this space.
Each page that appears in the Editor will have a tab in the top bar. Names in blue are saved. Names in brown with an asterisk are unsaved; click CTRL + S to save one tab. Click CTRL + SHIFT + S to save all unsaved tabs. Tabs are generally saved automatically when moving from one to another. Just in case, make sure to save all tabs prior to releasing source code.
Support Panel (if necessary) on the right
Support is always just a click away. Click the (?) key in the top bar to open the Support Panel on the right. It will provide on-screen information to explain different aspects of the App Builder. Click (?) again or × to close it. You can also open the documentation in a new tab.
Status Bar across the bottom.
The App Builder provides information as you build. The number of Errors (i.e. (x)) and Warnings (i.e. /!\) are listed. Note that both errors and warnings are shown each time a page is saved and they may be removed when subsequent steps are taken. In other words, it is best to complete the basic settings before consulting the Status Bar.
Preview instances is a feature that provides snapshots of your Development Instances to show changes without a formal release.
- Click
Preview Instances. ClickStarton the initial visit andRefreshon subsequent visits to update the preview with the latest changes (make sure all of the tabs are saved). - Then click the URL to open it in a browser tab. If the tab is still open in the web browser, click “Refresh” to reload it to see the latest version. Each “Refresh” will reset the database to the state of the Development Instance.
Useful Tips
- Use shortcuts
- Use the search console
- Check the Status Bar at the bottom for errors and warnings