Jetveo Resorts - Task Workflow
Marketing and Promotion of Jetveo Resorts are an important part of the business. This is an app that establishes a workflow for the members of both departments to maintain projects.
This tutorial will show how to implement the following elements:
- Automated Emails
- Workflow
- Kanban Board
- In-house Communication
- Attachments
NOTE:
• This text expects that the user has a basic understanding of the Jetveo Platform and App Builder (i.e., Boot Camp, Advanced Topics); therefore, basic steps have been omitted (e.g., Click Close; Save changes: Ctrl + S; select an icon).
• This tutorial relies heavily on screenshots as references for how the different pages should be established. Additional instructions are provided to emphasize significant information.
• The order of the instructions may be slightly different from the screenshots in the user interface because more recently created tabs are put at the top of the subsections. In other words, the Task entity is logically the first one to be created, but it will be listed under both Docs (which is used for Attachments) and Comment (which is used for the Comments section).
• Depending on the order of implementation of these instructions, error messages and warnings will be shown in the Status Bar at the bottom. They can be ignored until the subsequent steps fill in the appropriate connections.
Marketing and Publicity Task Workflow
1.0 DATA
1.1 Codebooks
Three codebooks will be established as the foundation for the app.
1.1.1 Task Importance
The Task Importance codebook will categorize the tasks and be shown in the Kanban dashboard presentation.
- Name: Task Importance
- Create Display Attribute: Name (i.e., default setting)
- Codebook Entries (Code, Name):
| Code | Name |
|---|---|
| CRITICAL | Critical |
| MAJOR | Major |
| MINOR | Minor |
| INFORMATION | Information |
1.1.2 Task Status
The Task Status codebook will be used to establish the steps of the Kanban dashboard.
- Name: Task Status
- Create Display Attribute: Name (i.e., default setting)
- Codebook Entries (Code, Name):
| Code | Name |
|---|---|
| NEW | New |
| ONGOING | Ongoing |
| FINISHED | Finished |
| ACCEPTED | Accepted |
1.1.3 Task Type
The Task Type codebook will be used to categorize tasks. This will be shown on the Kanban dashboard.
- Name: Task Type
- Create Display Attribute: Name (i.e., default setting)
- Codebook Entries (Code, Name):
| Code | Name |
|---|---|
| DESIGN | Graphic Design |
| BLOG | Blog Post |
| LP | Landing Page |
| VIDEO | Marketing Video |
| PRESENTATION | Marketing Presentation |
| BROCHURE | Brochure |
| CALENDAR | Calendar |
| MISCELLANEOUS | Miscellaneous |
1.2 Entities
Three entities will hold the data that will be necessary for the tasks and workflow of this app.
1.2.1 Task
Note that the “Dates” Inherited Aspects are described in the next section of this document.
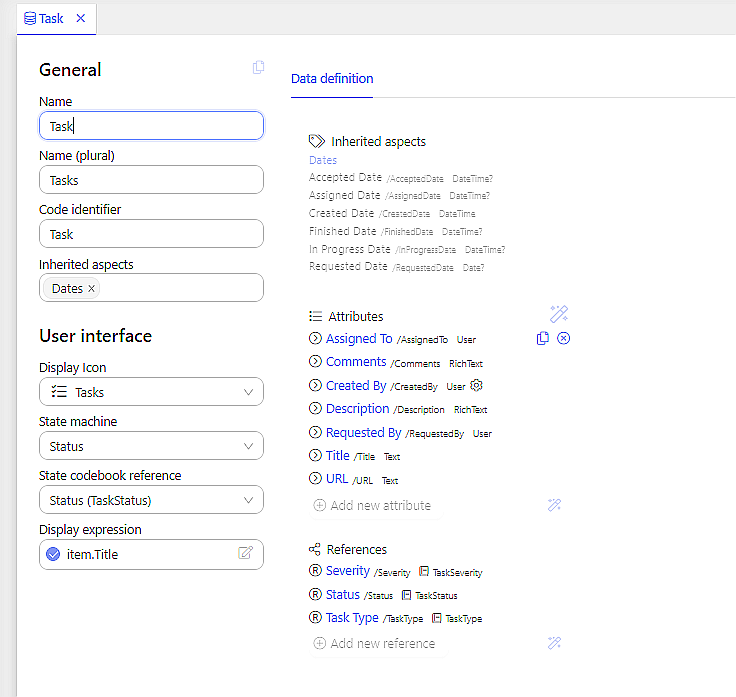
General
Set Name to: Task
User Interface
Set Display Icon to: Tasks
Automatic Actions
Set Create Display Attribute to: Title
On Step 2, verify that all of the User Interface pages are marked.
Attributes
The list of the Attributes (with the Type). Click Add New Attribute:
| Attribute | Type |
|---|---|
| Assigned To | User |
| Comments | Rich-text Markdown |
| Created By | User |
| Description | Rich-text Markdown |
| Requested By | User |
| URL | String |
Set Created By to: (task, db, ctx) => ctx.User
References
The list of References (with the Target). Click Add New Reference:
| Reference | Target | Default Value |
|---|---|---|
| Codebook | Task Importance | Information |
| Codebook | Task Status | New |
| Codebook | Task Type | Design |
Note: The State Machine values will need to be updated later.
1.2.2 Doc
This entity will be used to gather the attachments that can be made to a task. Note that Doc will not require any Entity Pages; on the second step of the wizard, unselect the Create, Detail and List pages.
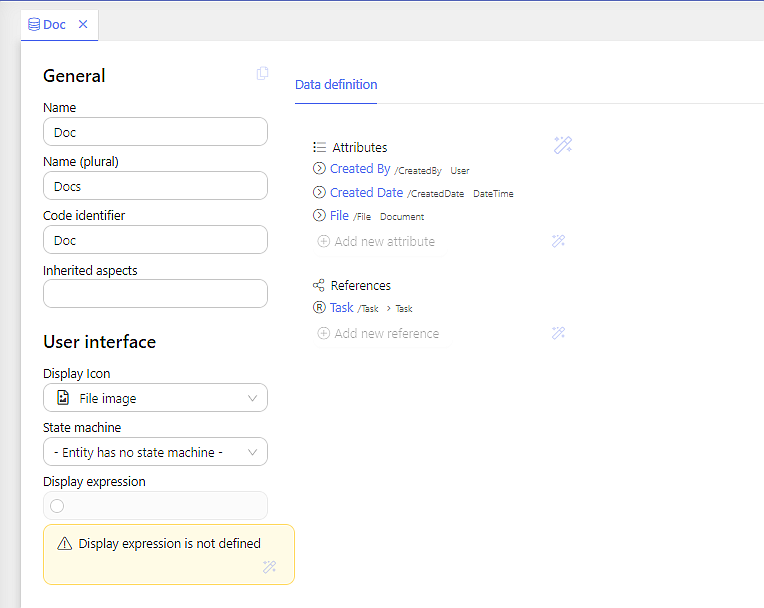
General
Set Name to: Doc
User Interface
Set Display Icon to: File Image
Automatic Actions
No Create Display Attribute is necessary.
On Step 2, deselect all of the pages in the Create Pages section.
Attributes
The list of the Attributes (with the Type). Click Add New Attribute:
| Attribute | Type |
|---|---|
| Created By | User |
| File | Document |
References
The list of References (with the Target). Click Add New Reference:
| Reference | Target |
|---|---|
| Direct | Task |
1.2.3 Comment
This entity will gather the comments within the Communication section of the individual tasks.
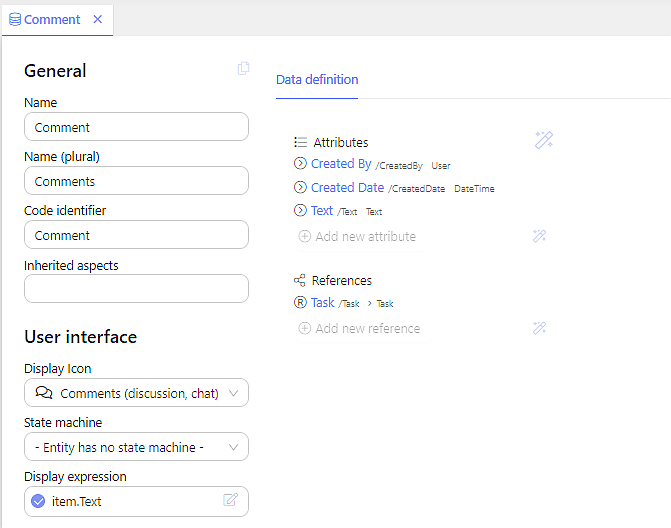
General
Set Name to: Comment
User Interface
Set Display Icon to: Comments (discussion, chat)
Automatic Actions
Set Create Display Attribute to: Text
On Step 2, verify that all of the User Interface pages are marked.
Attributes
The list of the Attributes (with the Type). Click Add New Attribute:
| Attribute | Type |
|---|---|
| Created Date | Date and Time |
| Created By | User |
References
The list of References (with the Target). Click Add New Reference:
| Reference | Target |
|---|---|
| Direct | Task |
1.3 Aspects
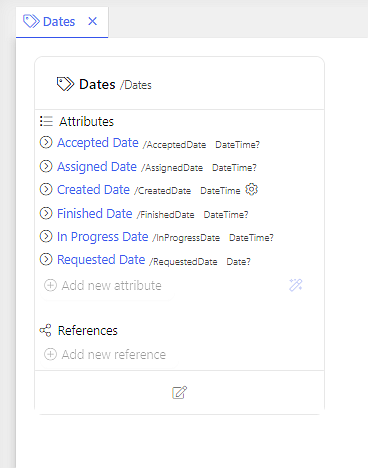
General
Set Name to: Timestamp
Attributes
| Attribute | Type | Null? |
|---|---|---|
| Accepted Date | Date and Time | Mark Allow Null |
| Assigned Date | Date and Time | Mark Allow Null |
| Created Date | Date and Time | — |
| Finished Date | Date and Time | Mark Allow Null |
| In Progress Date | Date and Time | Mark Allow Null |
| Requested Date | Date and Time | Mark Allow Null |
For Created Date, set the Default Value:
(task, db, ctx) => DateTime.Now
Go back to each entity. Located Inherited Aspects and select: Timestamp
2.0 USER INTERFACE
2.1 Share Views — Task View
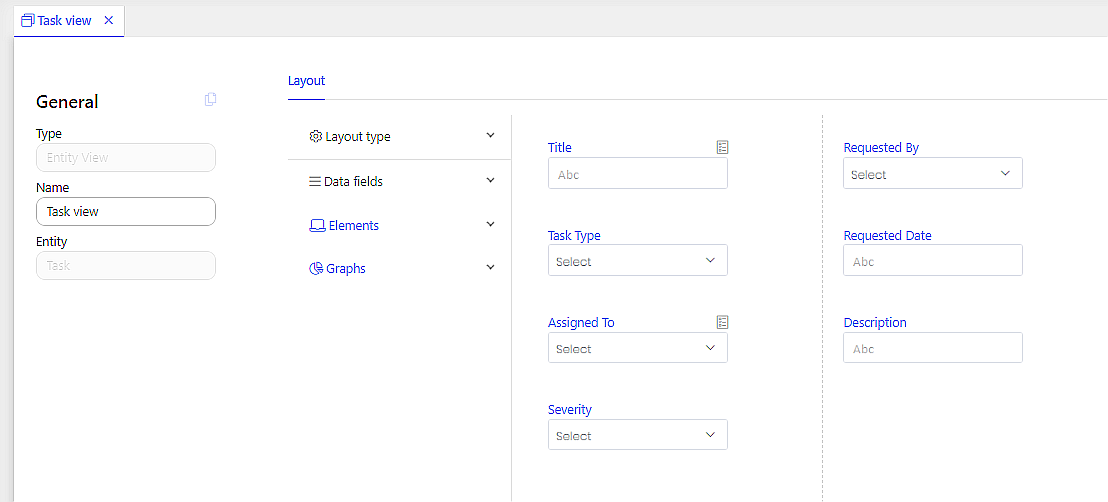
General
- Set Type to: Entity View
- Set
Nameto: Task View - Set
Entityto: Task
Layout
Select Data Fields and select the following:
First Column:
- Title
- Task Type
- Assigned To
- Importance
Set Title and Assigned To so that they have validations to make the data required.
Second Column:
- Requested By
- Requested Date
- Description
2.2 Entity Pages
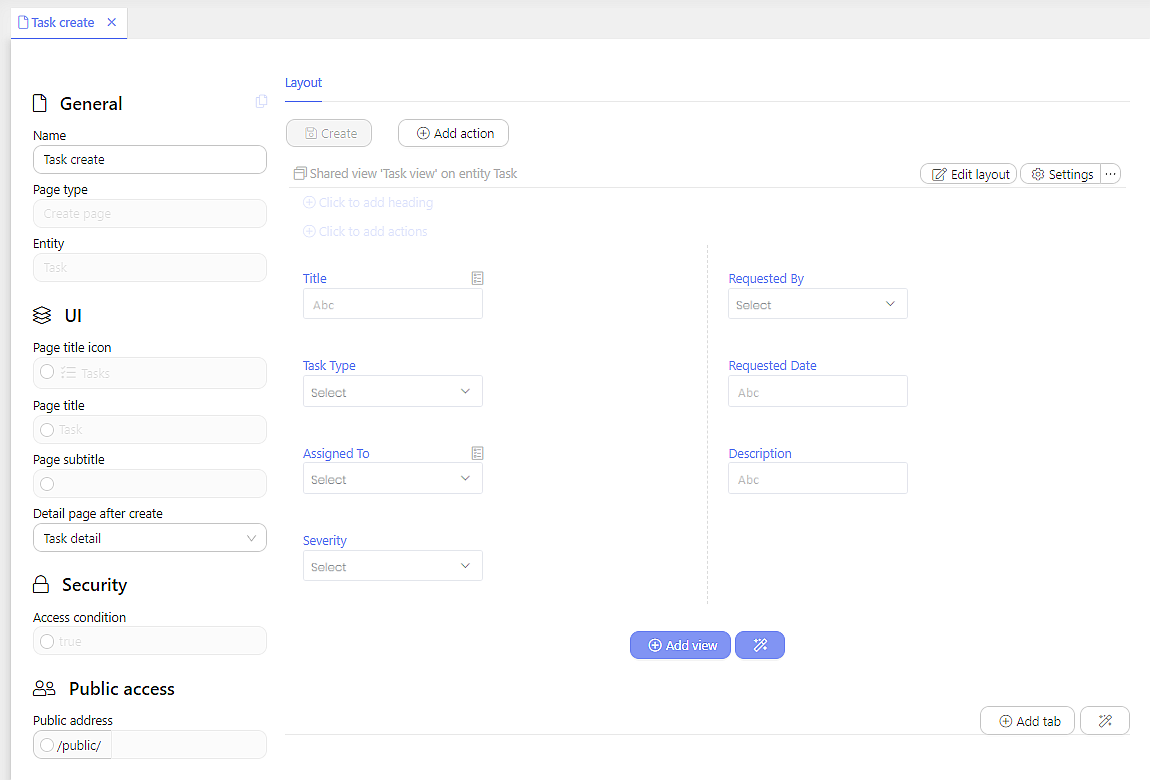
2.2.1 Task Create
Establish the Task View shared view for the Task Create page.
2.2.2 Task Detail
The Task Detail page is a snapshot of information for the task. It is divided into three parts:
- Task View shared view replicates the layout of the Task Create page;
- Communication provides a space for staff members to post messages relevant to the task; and
- Attachments allows for screenshots, documents and graphics to be attached to the task.
2.2.2.1 Shared View
Establish the Task View shared view at the top of the Detail page.
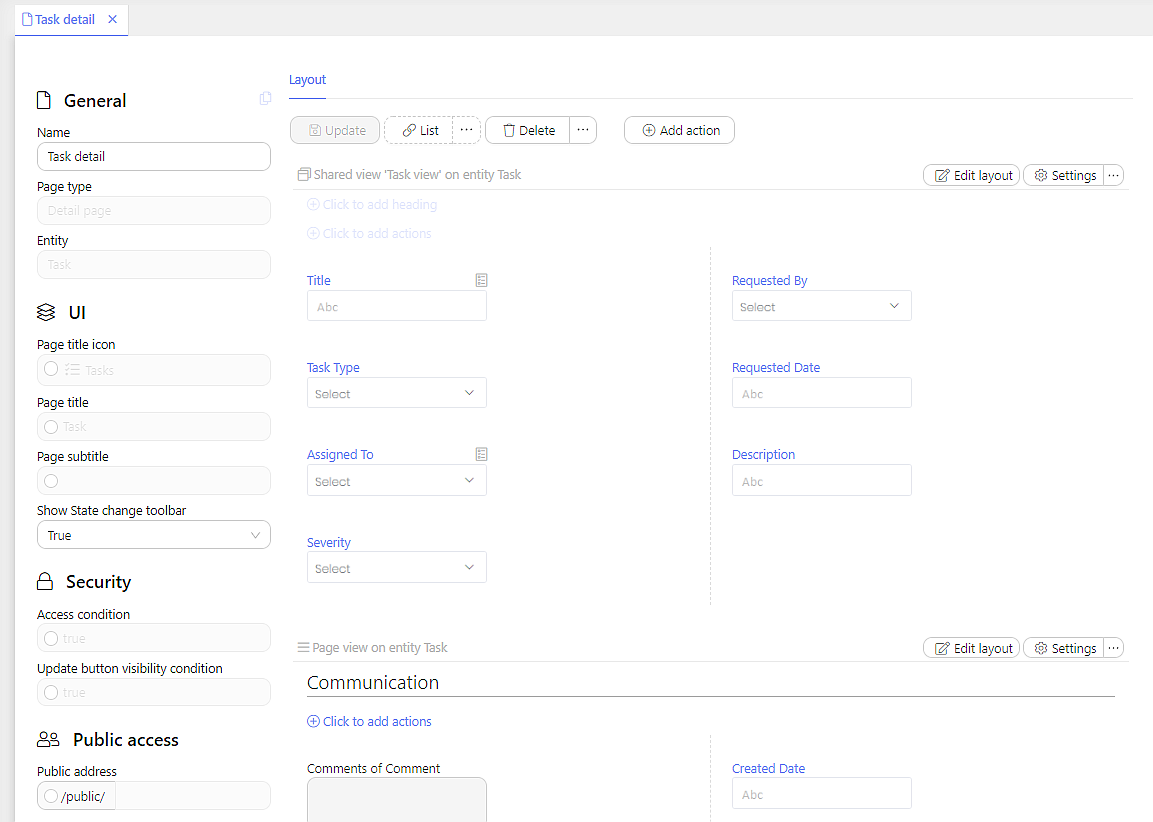
2.2.2.2 Communication
Click Add View.
First Column: In Elements, select Comments
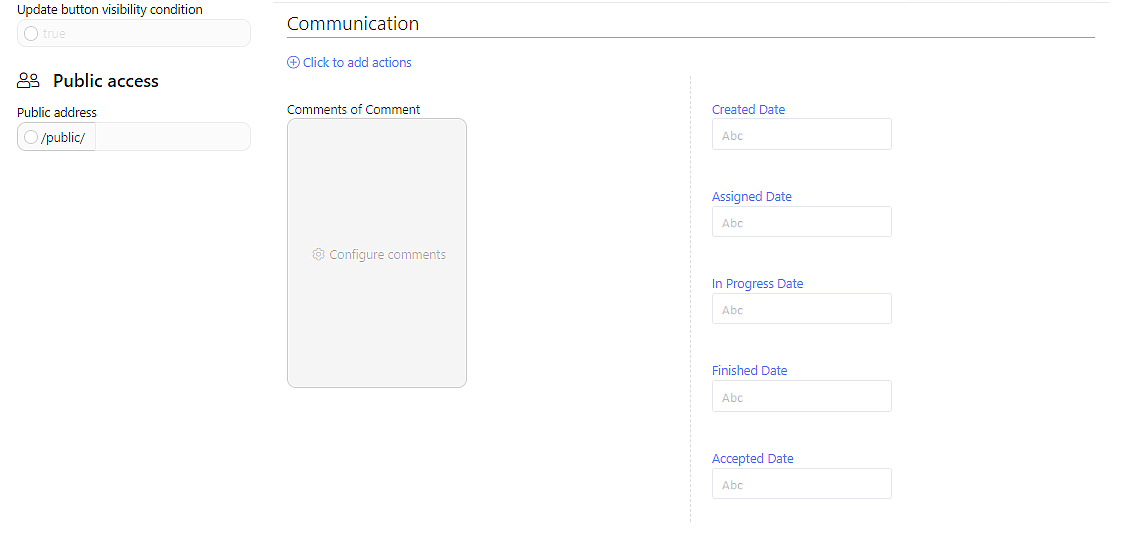
The settings for the Communication are as follows:
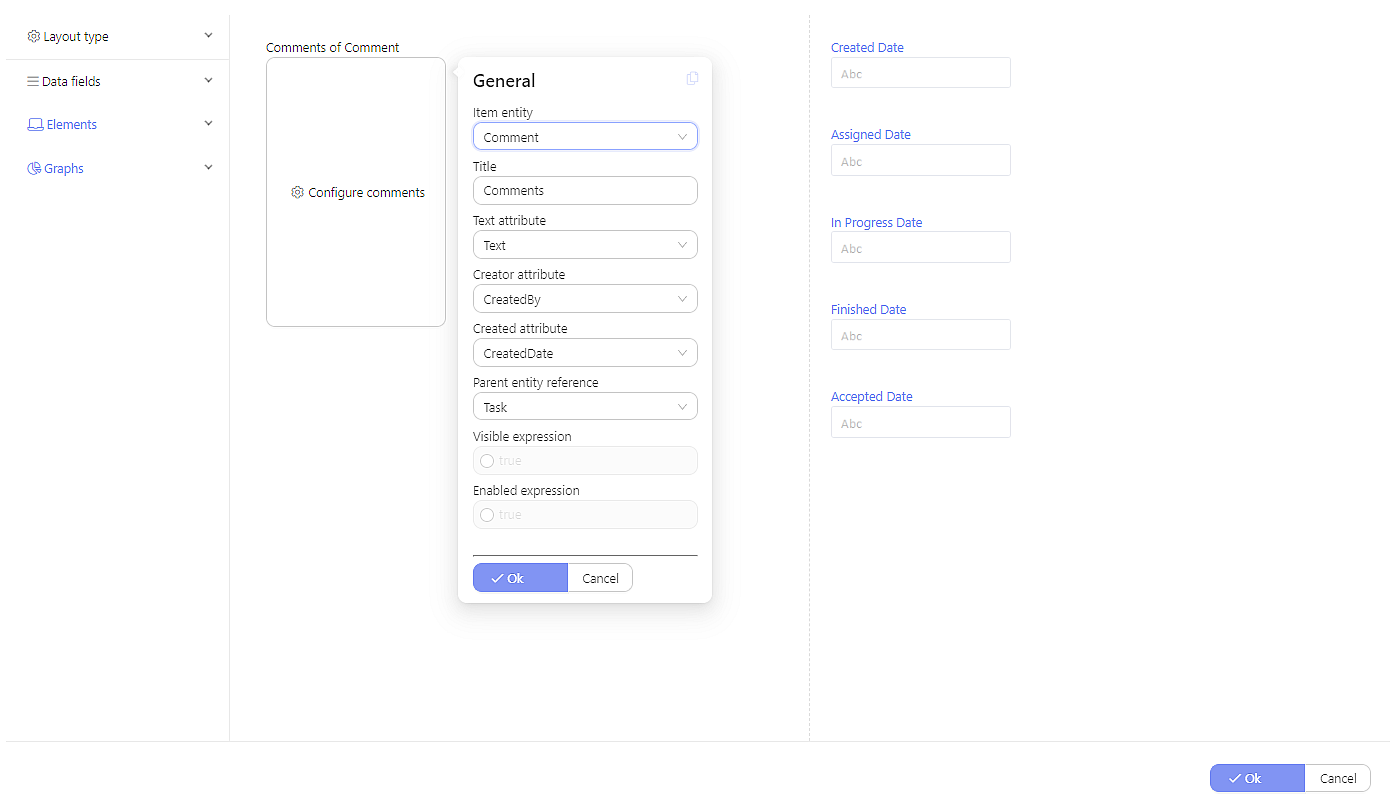
Second Column:
- Created Date
- Assigned Date
- In Progress Date
- Finished Date
- Accepted Date
Click to Add Header will provide a title for the section (i.e., Communications).
2.2.2.3 Attachments
Click Add View
In Elements, select Document List
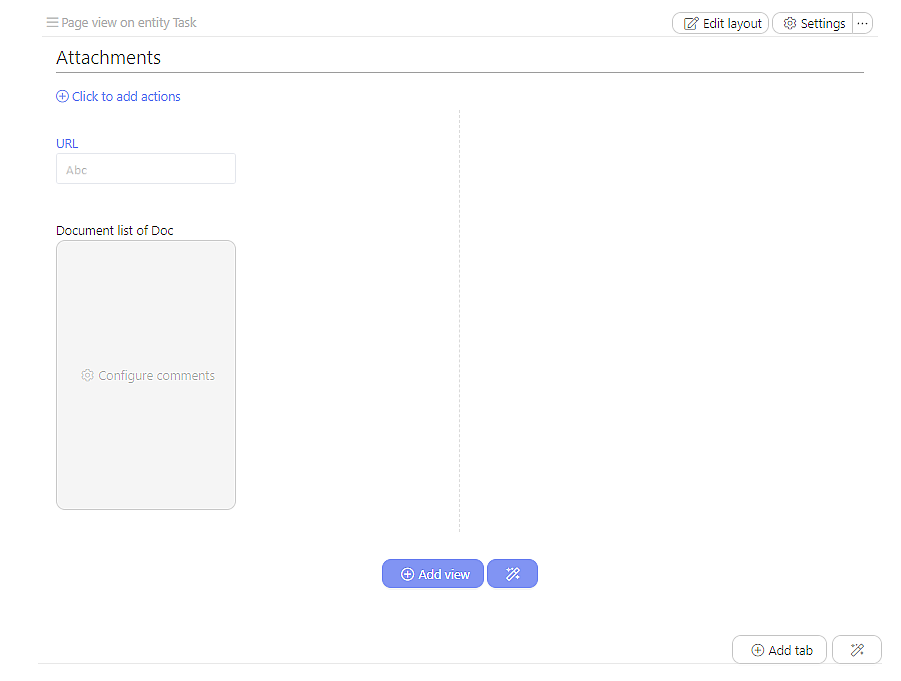
The settings for the Attachments are as follows:
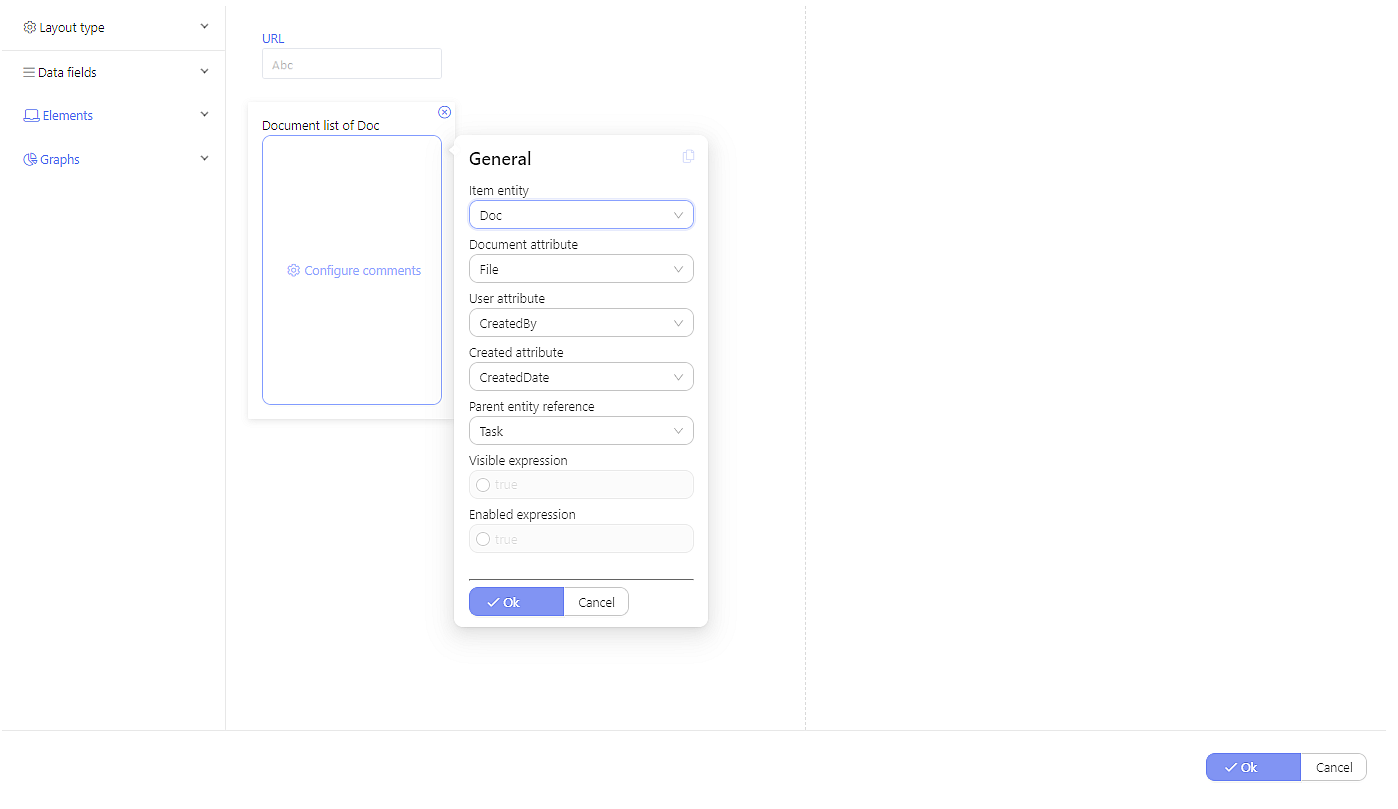
Click to Add Header will provide a title for the section (i.e., Attachments).
2.2.3 Task List
The Task List page is displayed in a logical presentation so that it can easily be exported as and Excel document for a hard-copy format.
2.2.3.1 General
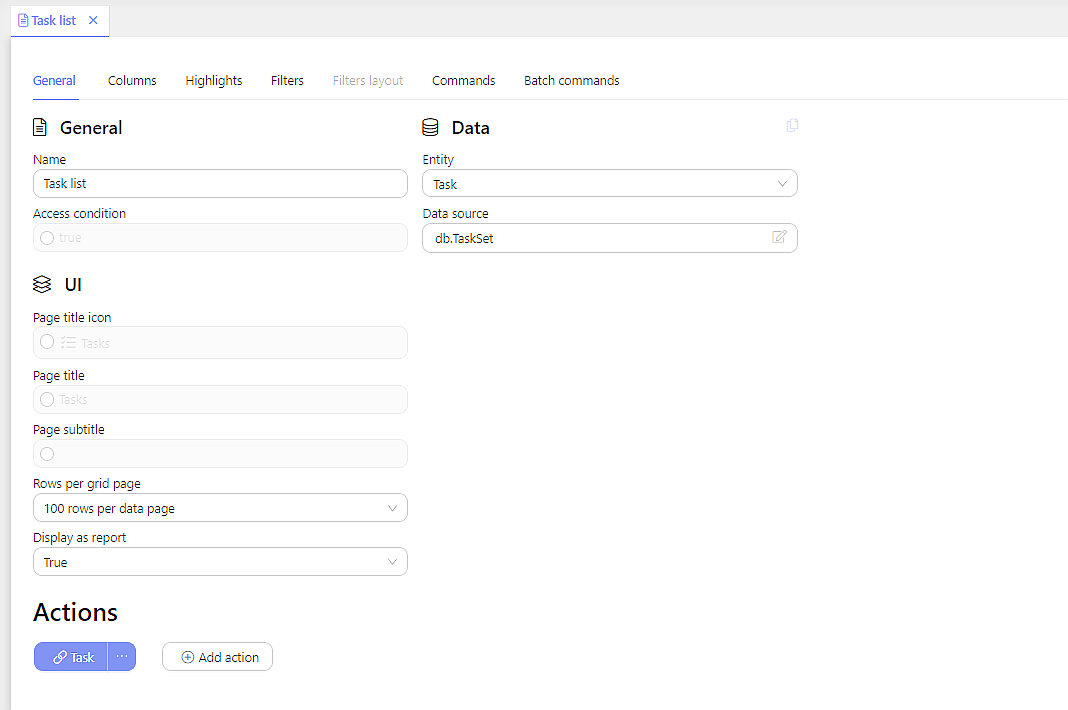
2.2.3.2 Column
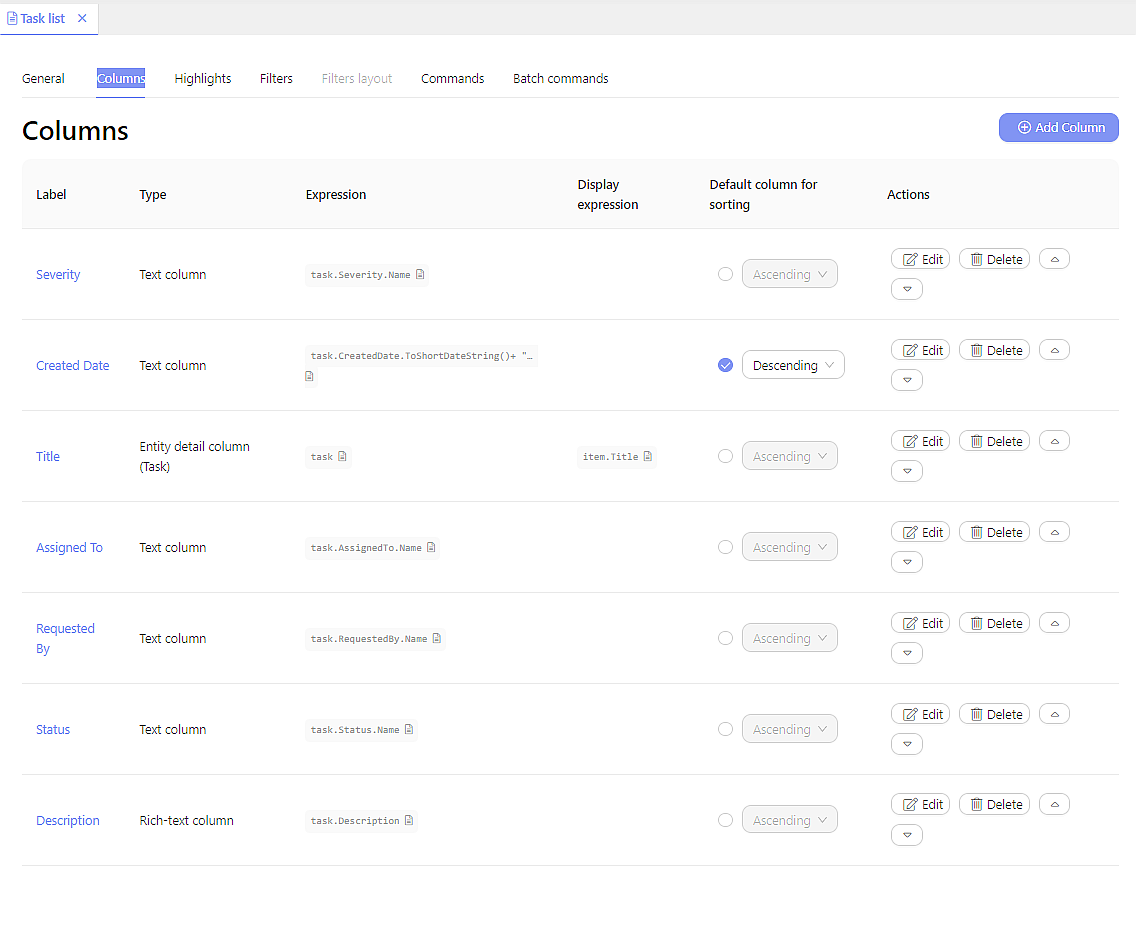
- Verify that
Created Datehas theText Expressioncoding set to:
(task) => task.CreatedDate.ToShortDateString()+ " " + task.CreatedDate.ToShortTimeString()
- And Verify that
Created Datehas theCustom Sort Expressionset to:
(task) => task.CreatedDate
2.3 Application Menu
Two links will be added to the horizontal top menu.

Add Entity Create Page that links to the Create page. Add List Page that links to the Task List page.
2.4 Dashboards — Task Overview
2.4.1 Basic Settings
The main user interface element of this Task App is the Kanban board.
Set Name to: Task Overview
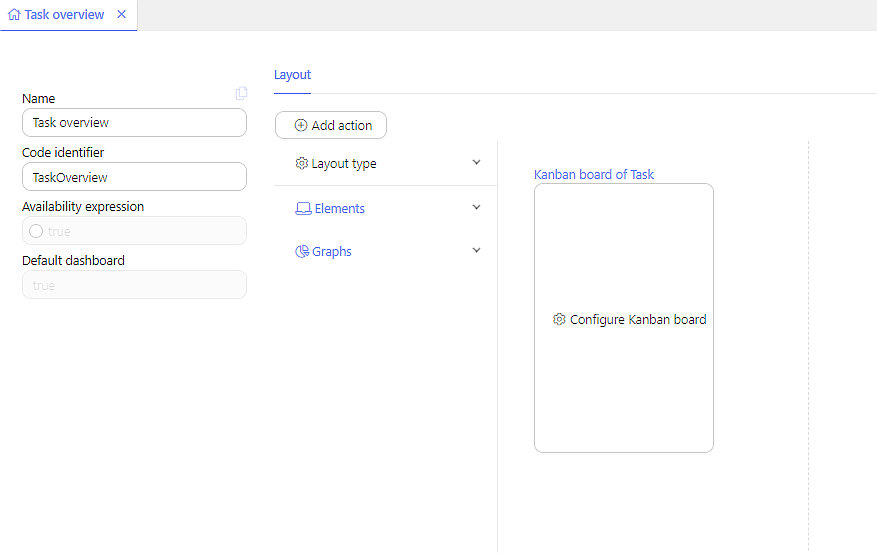
In Elements, select Kanban Board
2.3.2 Kanban Setup
Kanban is a system for moving tasks through regular steps. It provides an overview for the process and transparency for everyone who is involved.
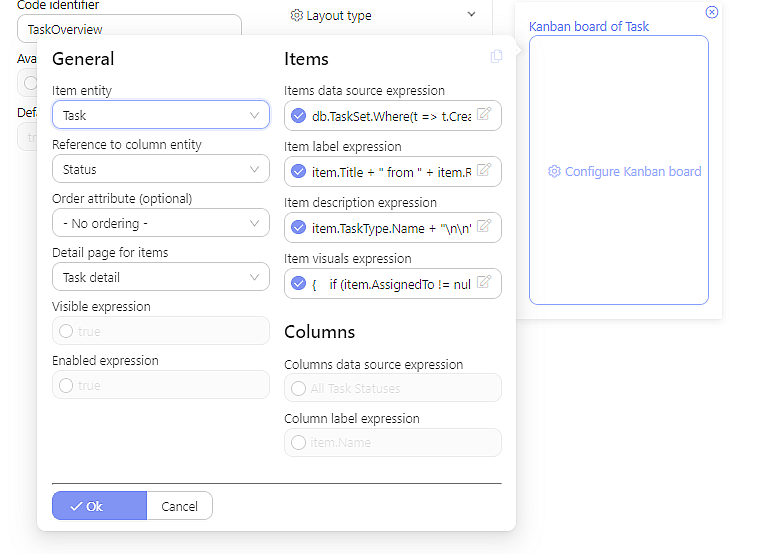
A significant amount of coding is required to define how the items will appear within the Kanban board.
Items Data Source Expressionwill add the initials (or an icon) for the user who either created the task or to whom the task was assigned:
(_, db, ctx) => db.TaskSet.Where(t => t.CreatedBy == ctx.User || t.AssignedTo == ctx.User || t.RequestedBy == ctx.User)
Item Label Expressionwill show the Title of the task and the person who created it:
(item) => item.Title + " from " + item.RequestedBy.Name
Item Description Expression will show the Task Type and the text that was provided as the Description.
(item) => item.TaskType.Name + "\n\n" + item.Description
Item Visuals Expression will add icons and color that change as the task moves across the Kanban board. It also adds text to emphasize the importance of tasks:
(item, db, ctx, visuals) =>
{
    if (item.AssignedTo != null)
    {
        visuals.AddUserAvatar(item.AssignedTo, "Assigned Owner");
    }


    if (item.TaskImportance == TaskImportance.CRITICAL)
    {
        visuals.AddTag(new Kanban.Tag("Priority", Kanban.TagStyle.Danger));
    }

    if (item.RequestedDate <= DateTime.Today && (item.TaskStatus == TaskStatus.NEW || item.TaskStatus == TaskStatus.ONGOING))
    {
        visuals.AddIcon(AppIcon.Warning);
    }
}
3.0 BUSINESS
3.1 State Machines
There are only four steps in the workflow that will define the movement of tasks through the Kanban board. The main workflow will be named “Status” and it will be based upon the TaskStatus codebook.
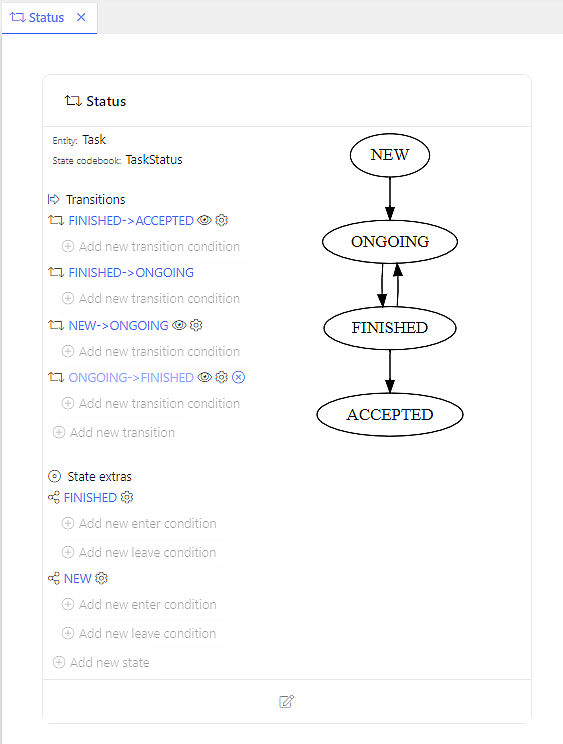
Additional information should be provided to transitions:
FINISHED -> ACCEPTED
Set Transition Handler to:
(task, db, ctx) =>
{
    task.AcceptedDate = DateTime.Now;
}
Set Is Applicable to:
(task, db, ctx) => task.RequestedBy == ctx.User || task.CreatedBy == ctx.User
NEW -> ONGOING
Set Transition Handler to:
(task, db, ctx) =>
{
    task.InProgressDate = DateTime.Now;
}
Set Is Applicable to:
(task, db, ctx) => task.AssignedTo == ctx.User
ONGOING -> FINISHED
Coding will be added for Transition Handler and Is Applicable as part of 6.0 Email Notification.
State Extras
This section will be added as part of the 6.0 Email Notification
4.0 CONFIG
4.1 Resources — Add Company Logo
A logo or image needs to be uploaded to be made available for use on the User Interface. In Resources, click Add Resource and select: Add Image Resource
4.2. Package Settings — Place Company Logo
On the Package Settings page, after the image has been uploaded, click Application Logo and select the logo from the drop-down menu.
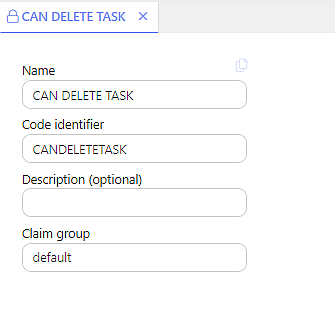
5.0 SECURITY
5.1 Security Claims
This internal app will have only a simple Security Claim. User access can be defined to specific levels.
6.0 EMAIL NOTIFICATION
There are several steps that are involved with establishing automated emails to be connected to this app.
6.1 Config > App Features — Email Notifications
First you need to establish the configurations that will establish the email communication. Go to Config > App Features. Create a new page.
- Set
Nameto: Email Notifications
Add the following Config Items (i.e., click Add Config Item):
-
Name: SMTP Server
SetValue Typeto: Text
SetDefault Valueto: TBD -
Name: SMTP Port
SetTypeto: Number
SetDefault valueto: 587 -
‘Name’: SMTP Login
SetTypeto: Text
SetDefault valueto: ** TBD** -
Name: SMTP Password
SetTypeto: Text
SetDefault valueto: TBD -
Name: SMTP Email
SetTypeto: Text
SetDefault valueto: TBD
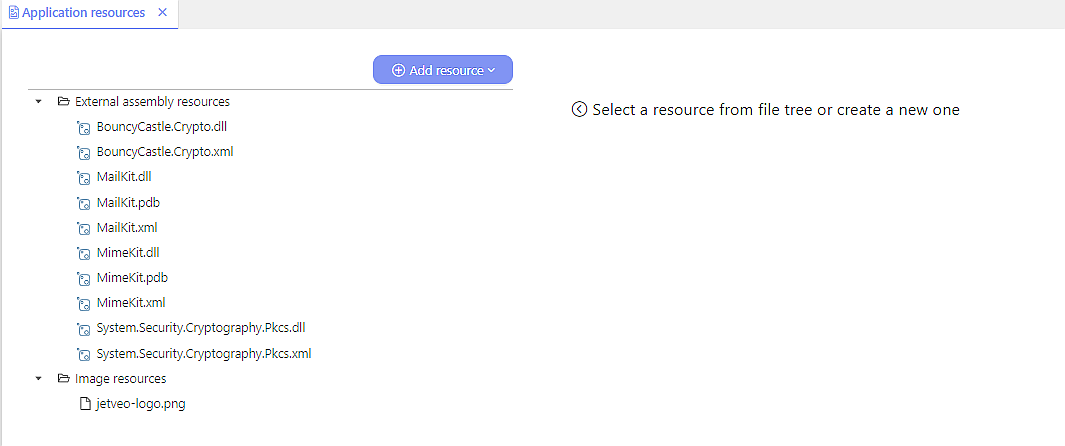
6.2 Config > Package > Resources
Move to the top of the Config subsection. Under Package, click Resources.
Click Add Resource.
Select “Add NuGet Packages Assembly Resource”
Search for MailKit.
Click Add Package.
6.3 Custom Code > Templates — Establish the text for the email
Go to Code > Templates. Create a new page.
Name of Template: Text For Email
Template Code Language: Html
Model Type: Entity
Entity: Task
NOTE: The email requires a user to have the Task assigned to them; otherwise it will fail.
<html>

<head>
</head>

<body>
    <table>
        <tr>
            <td>Task Assigned</td>
        </tr>
        <tr>
            <td>Hi @Model.AssignedTo.Name ,</td>
        </tr>
        <tr>
            <td>Task "@Model.Title" has been assigned to you.</td>
        </tr>
    </table>
</body>

</html>
Note: Assigned To is used in the template text below. It may need to be added as an attribute for the Task entity to establish the user to whom the email will be sent.
6.4 Code > Custom Code — SmtpMailer
Go to Code > Custom Code. Create a new page.
Set Name of file to: SmtpMailer
Copy the following:
using System.Collections.Generic;
using MailKit.Net.Smtp;
using MimeKit;
using MimeKit.Text;

internal class SmtpMailer
{
    private readonly bool isEnabled;
    private readonly string smtpServer;
    private readonly int smtpPort;
    private readonly string account;
    private readonly string password;
    private readonly string sender;

    public static readonly SmtpMailer Default = new SmtpMailer(
        App.Features.EmailNotifications.IsEnabled,
        App.Features.EmailNotifications.Config.SMTPServer,
        App.Features.EmailNotifications.Config.SMTPPort,
        App.Features.EmailNotifications.Config.SMTPLogin,
        App.Features.EmailNotifications.Config.SMTPPassword,
        App.Features.EmailNotifications.Config.SMTPEmail);

    public SmtpMailer(string smtpServer, int smtpPort, string account, string password, string sender) : this(true, smtpServer, smtpPort, account, password, sender)
    {

    }

    private SmtpMailer(bool isEnabled, string smtpServer, int smtpPort, string account, string password, string sender)
    {
        this.isEnabled = isEnabled;
        this.smtpServer = smtpServer;
        this.smtpPort = smtpPort;
        this.account = account;
        this.password = password;
        this.sender = sender;
    }

    public void SendEmail(string recipient, string subject, string content)
    {
        SendInternal(new [ ] { recipient }, subject, content, false);
    }

    public void SendHtmlEmail(string recipient, string subject, string htmlContent)
    {
        SendInternal(new [ ] { recipient }, subject, htmlContent, true);
    }

    public void SendMassEmail(IEnumerable<string> recipients, string subject, string content)
    {
        SendInternal(recipients, subject, content, false);
    }

    public void SendMassHtmlEmail(IEnumerable<string> recipients, string subject, string htmlContent)
    {
        SendInternal(recipients, subject, htmlContent, true);
    }

    private void SendInternal(IEnumerable<string> recipients, string subject, string content, bool isHtml)
    {
        if (!this.isEnabled)
        {
            return;
        }

        using(var client = new SmtpClient())
        {
            var message = new MimeMessage();
            message.From.Add(MailboxAddress.Parse(sender));
            foreach(var recipient in recipients)
            {
                message.To.Add(MailboxAddress.Parse(recipient));
            }

            message.Subject = subject;

            var bodyFormat = isHtml ? TextFormat.Html : TextFormat.Plain;
            message.Body = new TextPart(bodyFormat) { Text = content };

            client.Connect(smtpServer, smtpPort);
            client.Authenticate(new System.Net.NetworkCredential(account, password));
            client.Send(message);
            client.Disconnect(true);
        }
    }
}
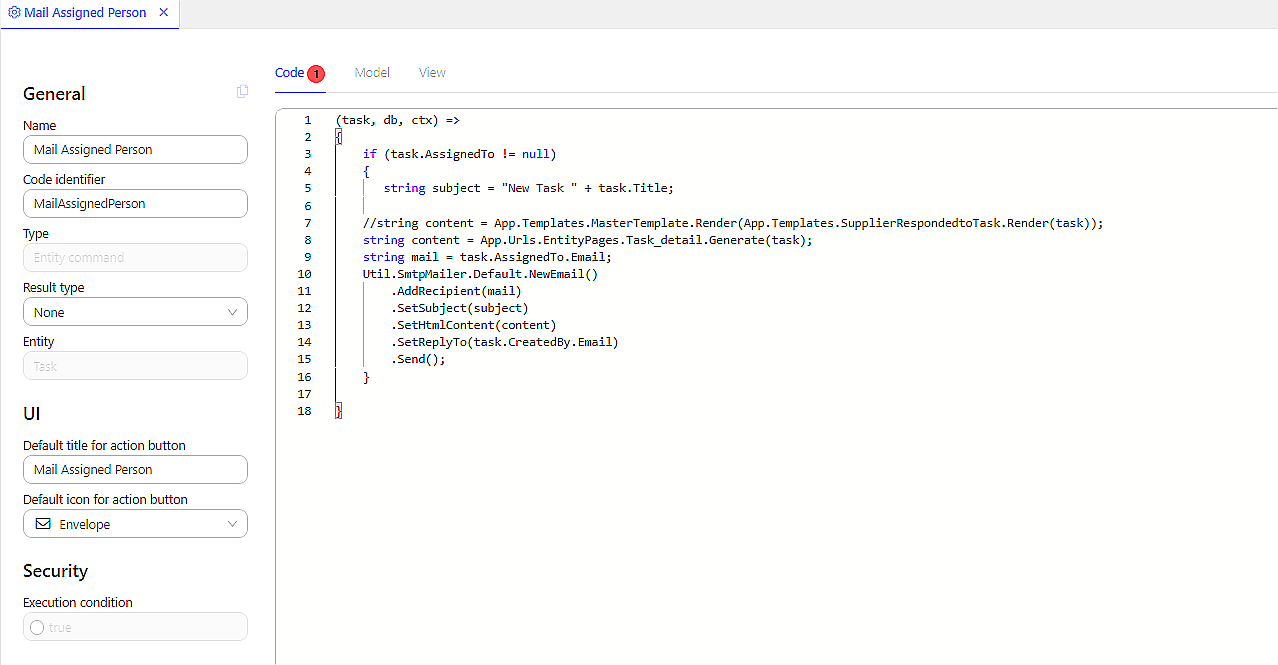
6.5 Business > Commands — Mail Assigned Person
Go to Business > Commands. Create a new page.
Name: Main Assigned Person
Set Type to: Entity Command
Set Entity to: Task
(task, db, ctx) =>
{
    var content = App.Templates.TextForEmail.Render(task);
    var subject = "Task Assigned";
    var mail = task.AssignedTo.Email;

    //this renders a template with task its called on
    App.Templates.TextForEmail.Render(task);
    //this sends email
    SmtpMailer.Default.SendHtmlEmail(mail, subject, content);
}
6.6 Update the Task Detail page
Go to UI > Entity Pages and double-click Task Detail
- At the top of the Layout section, click
Add Action - Set
Typeto: Executive Entity Command - Set
Entity Commandto: MainAssignedPerson - In the UI section, set
Button Labelto: Send Email` - Set
Iconto: Envelope
6.7 Create a Production instance
After you release the app, there are some adjustments that need to be made on the instance settings. Emails can be sent through a Development instance; however, it is probably better to establish it on the Production instance in order to send an email to actual users.
For this reason, it would be best to create a Production Instance and then apply the settings for Step 9.
Go to the App Overview.
- Click
Settings - Click the
Featurestab - Mark Email Notifications
- Click
Configure
Input the following information (i.e. click Change) according to your email server:
SMTP Server: TBD
SMTP Port: 587 (This should already be established.)
SMTP Login: TBD
SMTP Password: TBD
SMTP Email: TBD