(1) Define the Data
- Support Ticket Tutorial -
Every app needs a solid foundation to organize and maintain data. Our Support Ticket app will require two types of data:
- a Codebook, which is a static list of predefined values; and
- Entities, which can be stored, manipulated and queried in the app database.
0. Create App
The shell for the app needs to be created before you can start to build it.
On the workspace, at the top of the side panel, click + Create App.
Give it a name, like Support Ticket App.
Click Create Application.
When you return to the workspace, in the new App Overview, click Edit Application.

1. Create the Codebook Static List
Support Tickets are often defined according to severity: Critical, Major, Normal and Minor. These will not change so they should be defined in a Codebook Static List.
- At the top of the Data side panel, click
(+) Createto get the general Create Dialog; clickCodebook Nameyour Codebook: Ticket Severity. Additional information will appear in the Name (plural) and Code Identifier boxes- The
Create Display Attributecheckbox shows Name by default. This will be used as a column in the Codebook static list. - Click
Finish

2. Add Rows to the Codebook
The Ticket Severity codebook needs values.
- Ticket Severity is open in the editor. Otherwise, it can be found in the Codebooks subsection
- Click
Edit Entries - Populate the TicketSeverity grid with values for
CodeandName. Copy and paste the grid below:
| CRITICAL | S1-Critical |
| MAJOR | S2-Major |
| NORMAL | S3-Normal |
| MINOR | S4-Minor |
- Click
OKto close the dialog box - Save changes:
Ctrl + S

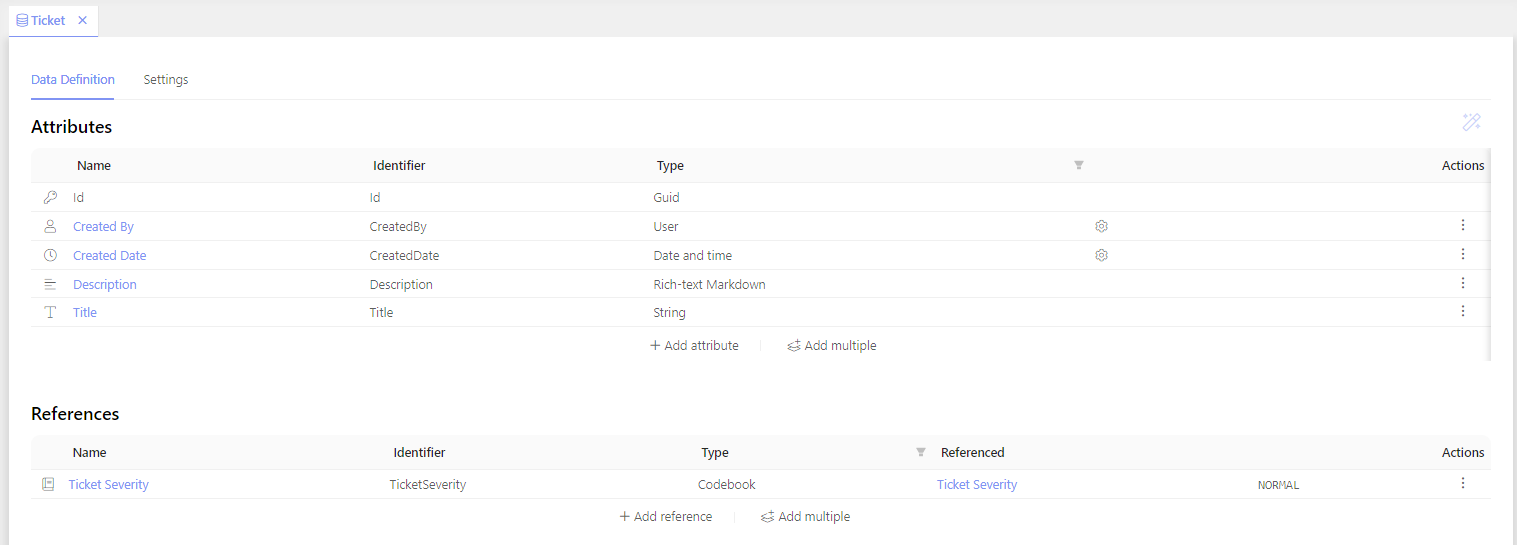
3. Create the Entities
Entities are where the data is stored. Attributes provide detailed definitions for parts of the entities.
- At the top of the Data side panel, click
(+) Create; clickEntity Nameyour Entity: Ticket- Set the
Display Iconto Tag. (i.e., type the word into the search bar or scroll through the drop-down menu) - Mark the
Create Display Attributecheckbox. Click in the text box. Type: Title. This will create an attribute and set it as a display expression for entity records. - Click
Next

- The Create Pages box has the following preselected: Create Page, Detail Page and List Page. These pages will be generated and used in the User Interface section (see below)
- Click
Finish

4. Reference the Entity to the Codebook
The Ticket Severity codebook needs to be connected to the Ticket entity.
- In the Ticket Entity Data Definition > References section, click
Add Reference - Set
Nameto: Ticket Severity - Set
Reference Typeto: Codebook - Set
Referencedto: Ticket Severity - Set
Default Codebook Valueto: NORMAL - Click
Save - Save Changes:
Ctrl + S

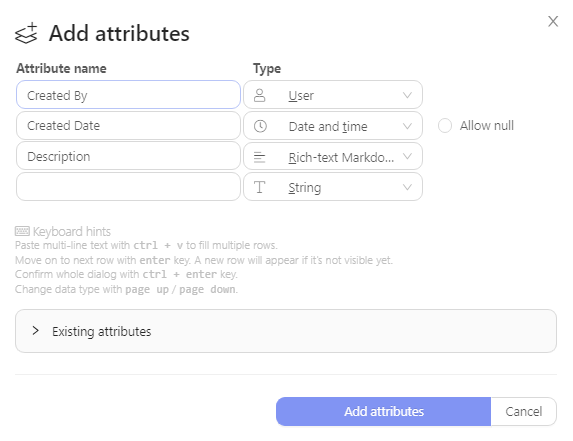
5. Add Attributes
There are many additional definitions that can be added as Attributes. For example, it would be useful to know the user who created the Support Ticket, when and, if it is critical, a detailed description of the issue.
- In the Ticket entity, in the Data Definition > Attributes section, click
Add multiple - Set
Attribute Nameto: Created By - Set
Typeto: User
More Attributes are created the same way: - Set
Attribute Nameto: Created Date - Set
Typeto: Date and Time - Set
Attribute Nameto: Description - Set
Typeto: Rich-text Markdown - Click
Add Attributes - Save changes:
Ctrl + S
6. Set Default Values
Created By and Created Date can be further defined. These definitions will establish values for the user and the date when a Support Ticket is created.
We want to set the currently logged in user as Created By and the current date and time as Created Date.
Add Default values:
- In the Data Definition > Attributes section, click the Created By attribute
- Mark the
Default Valuecheckbox. A dialog box opens. Set it to the following:
(ticket, db, ctx) => ctx.User
- Click
OK - Click
Close

- Click the Created Date attribute
- Mark the
Default Valuecheckbox. A dialog box opens. Set it to the following:
(ticket, db, ctx) => DateTime.Now
- Click
OK - Click
Close - Save changes:
Ctrl + S